|
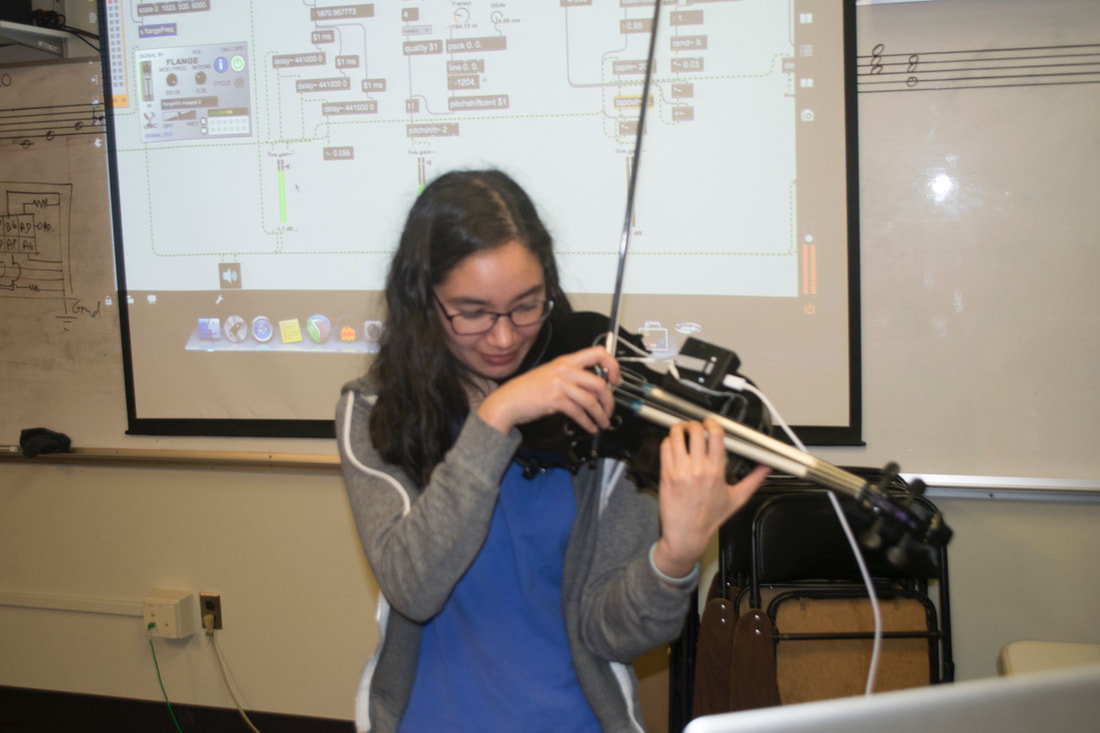
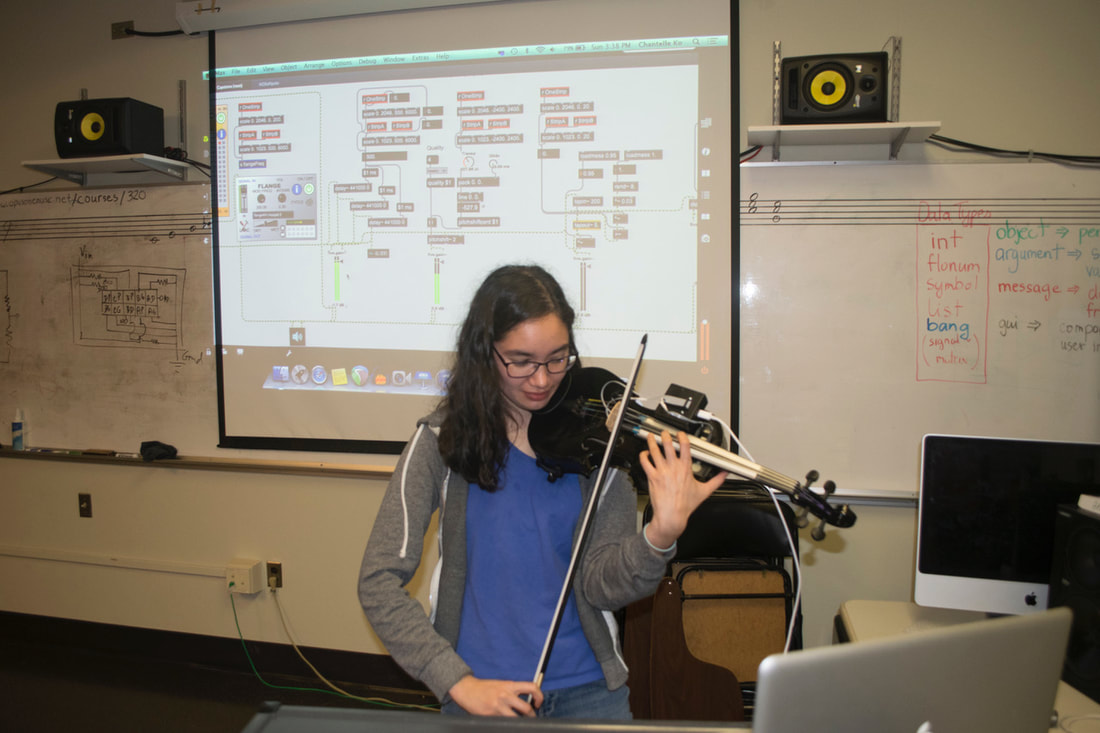
I added interactive video to my piece. I also have purchased my own violin pickup. This recording is a much more accurate representation of what it sounded like in person than the Winter Bang! Festival recording.
And look! UBC School of Music noticed me! https://www.facebook.com/UBC.School.of.Music/videos/1808104445869305/
0 Comments
It's Christmas Eve and I purposefully left my TRAVIS violin at my apartment so that I wouldn't do work while I'm at my parent's place.... this plan failed.
Throughout working on my Capstone I had the idea that instead of using Softpots, I could run a voltage through the strings. I have read that it has been done before with velostat, and today I tested to see for myself. I still have plenty to do before I even get to this step, such as making the Arduino wireless and adding interactive video. However, this test satisfies my curiosity and has me looking forward to next year! It is the ghost of Christmas future!
I've been told by my classmates that the unprocessed sound is much louder in this recording than it was in person. This is because the hanging mics on stage were used to record the sound for the camera, so the processed sound from the speakers is not as present.
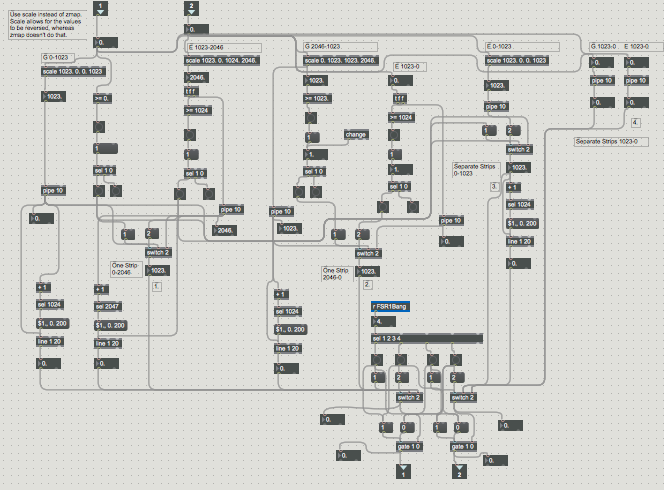
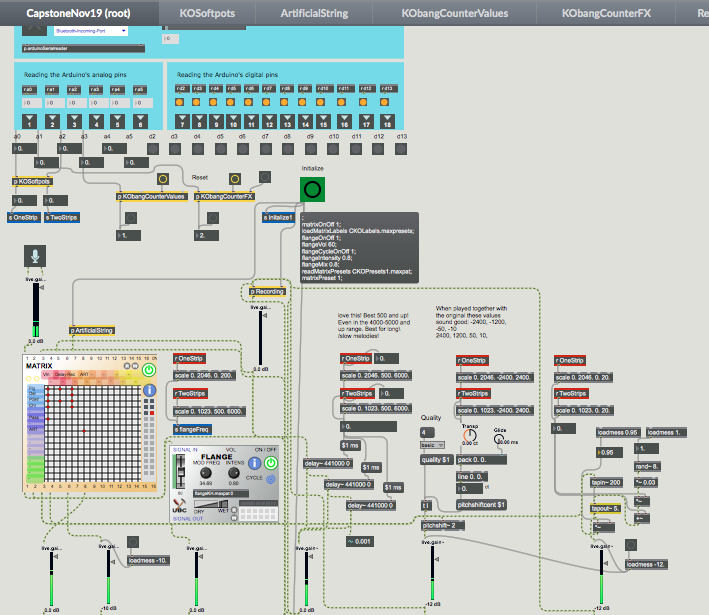
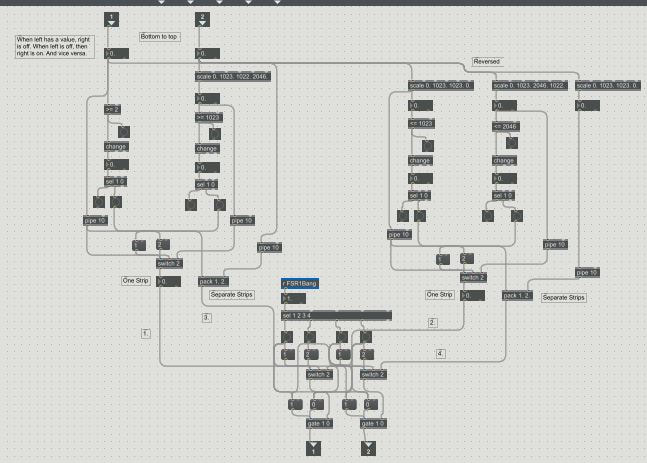
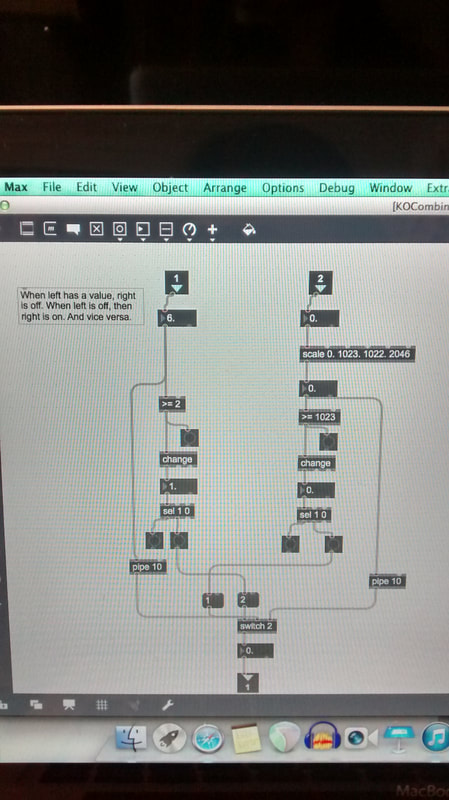
Settings (banged by FSR2): 1) Sound FX: Flange [sogs~] Samples: G = Shattering Glass; E = Birds 2) Sound FX: Flange, Delay [sogs~] Samples: G = Shattering Glass; E = Birds 3) (Artificial Harmonics section) Sound FX: Flange, Delay [sogs~] Samples: G = Chimes 4) (Pizz Section) Start Live Recording. Four 10sec samples, one after another. The sound that is affected by the sound fx are the ones being recorded, not the raw sound. Sound FX: Flange, Delay, Pitch Shift [sogs~] Samples: G = Bells 5) (High E Section) FSR1 starts the playback of each live recorded sample. I am using the [urn] object to make it randomly select which recording. There is a delay so that with one bang, 4 sec later it bangs a second time. The already affected samples are being pushed through the fx again. Sound FX: Flange, Delay, Pitch Shift, Chorus [sogs~] Samples: OFF 6) Sound FX: Flange, Delay, Pitch Shift, Chorus [sogs~] Samples: G = Bells; E = Birds I did not delete the capability for FSR1 to select the scaling parameters for the Softpots, or the Artificial C string. However, for this piece, they were creatively unneeded. I had left the Softpots scaled from 0-1023, and 1024-2046. Maybe I'll use the different Softpot settings and the C string for the next piece.
I needed to tweak the values I was getting from the softpots because they were being received in the opposite direction from what I had originally thought. I had also made it so when my finger releases, no matter which setting I am on, the values snap back to 0. I had also made fx presets for the piece I will present at the WinterBang! Festival.
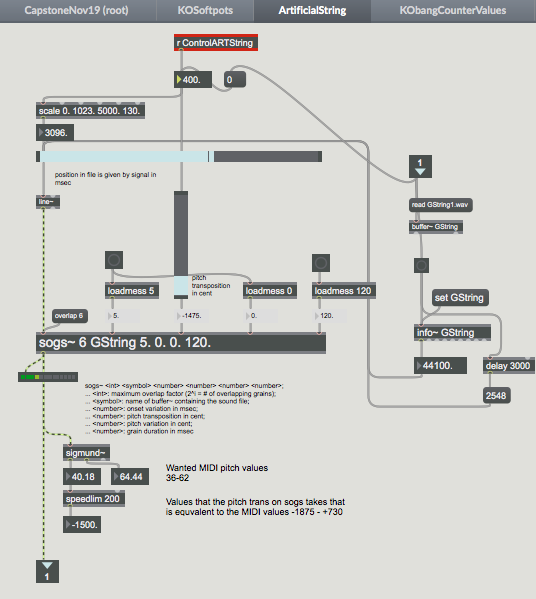
I added an "artificial string" with the [sogs~] object. I recorded a sample of my open G string, and used the sogs built in pitch shifting so that I can "play" the first softpot without needing to actually play the instrument. After recording the demo video I had changed it so that when my finger releases the softpot, the artificial string stops playing. I had also programmed it so that the artifical string stops when the first fx preset started, and then came back in for the last preset. After I watched the video, I think I'm going to leave it in for longer. I also added live recording and playback capabilities. Instead of having to press the FSR to start recording every individual snippet, I have it set so I can trigger the recording once, and it will record four short 10 second segments one after the other. For playback, each segment does need to be triggered individually. I have found in combination with the delay effect throughout the presets, layering recordings on top of each other blends in really nicely.
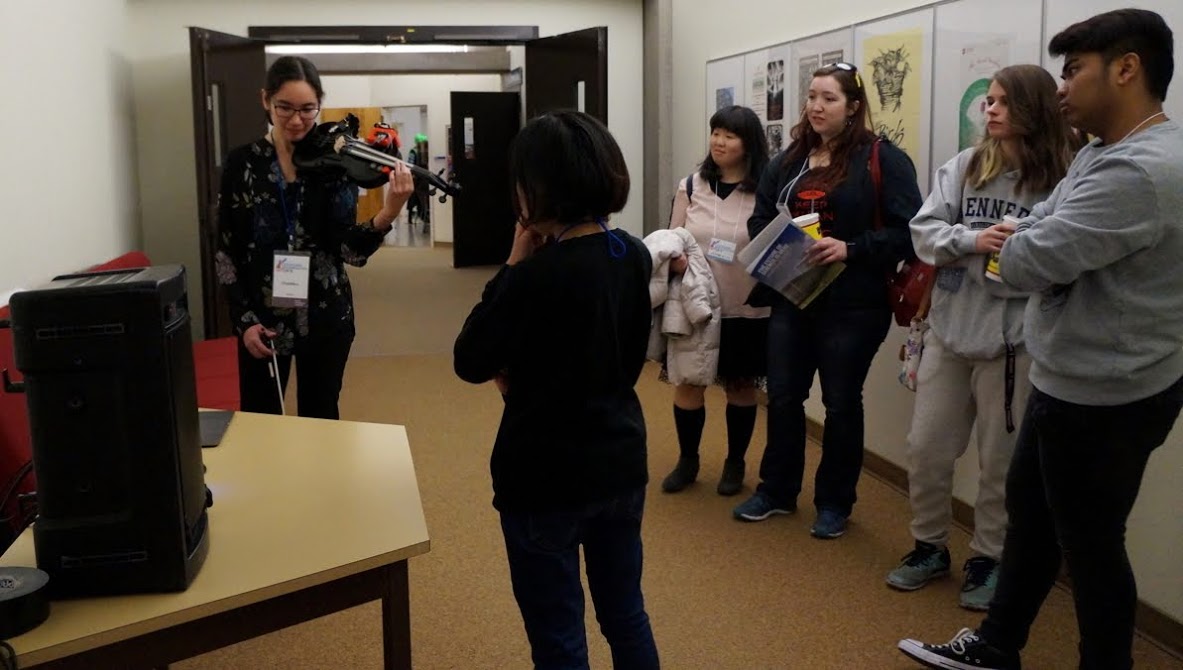
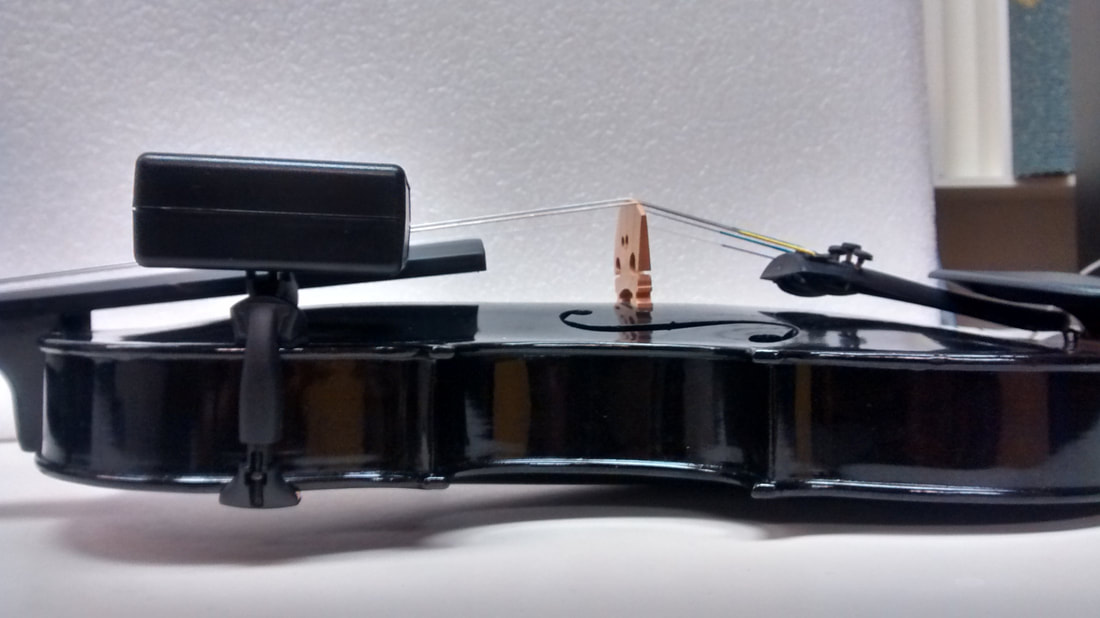
I tried out the interface for the first time. SO EXCITING!!!! My Max MSP patch needs some fine tuning, but the hardware is working perfectly! I slipped the wires underneath the bridge so that they would not be in the way of the bow and strings. Still need to get a clip to be sure that as the wires come around, my bow doesn't hit them while I am playing on the G string. Now I'll be planning out a demo for Bang! Festival.
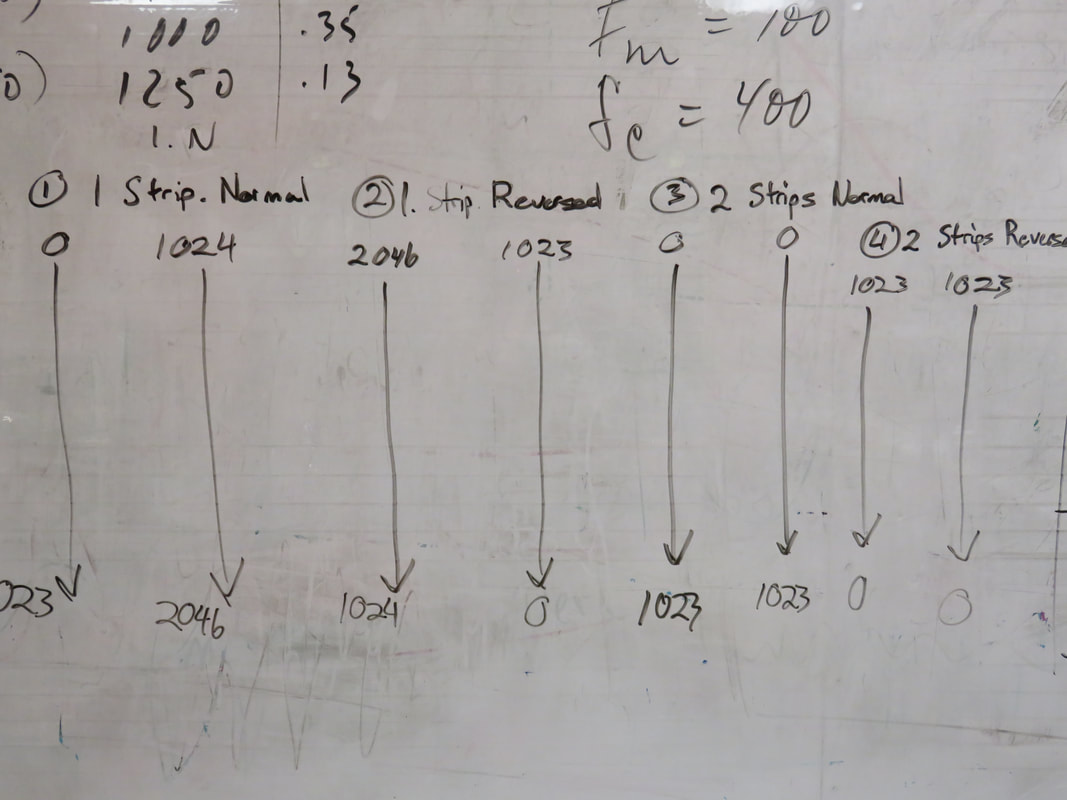
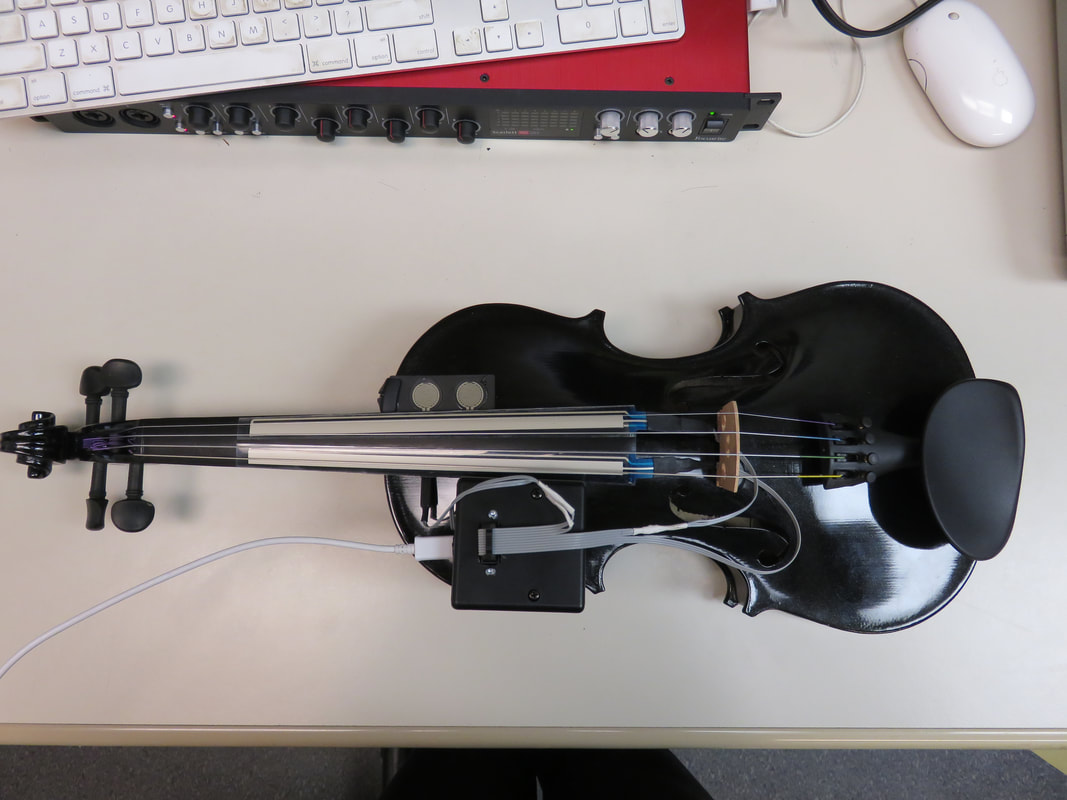
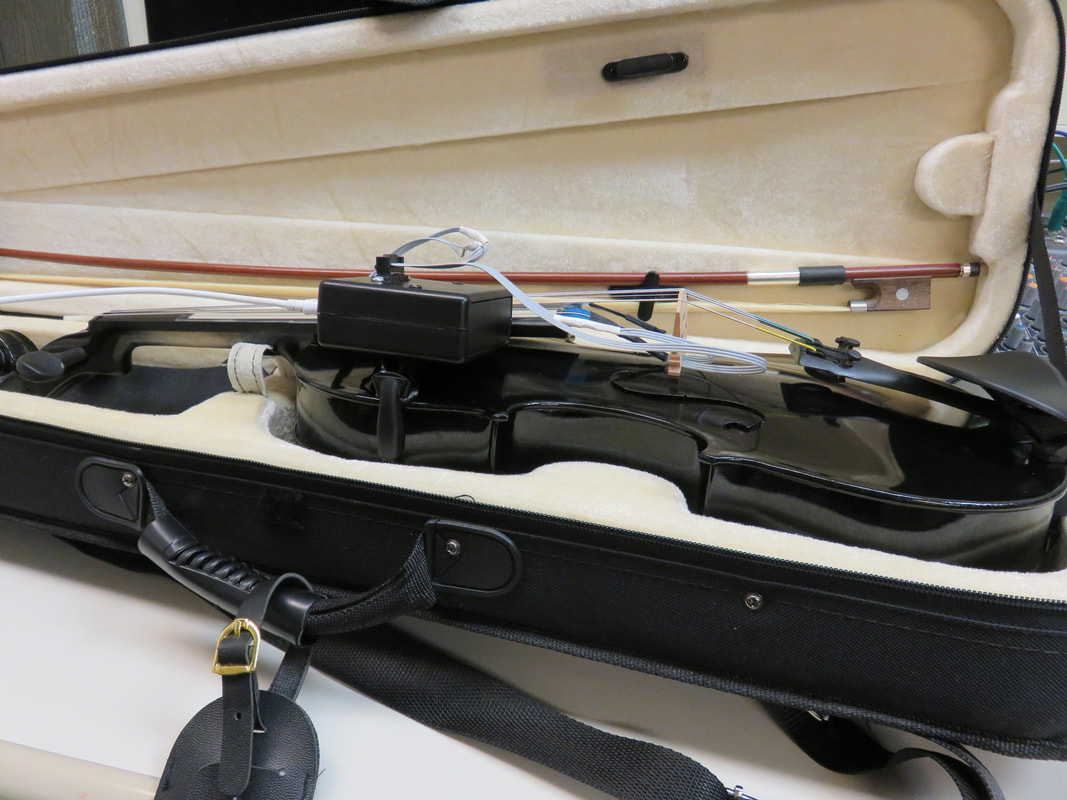
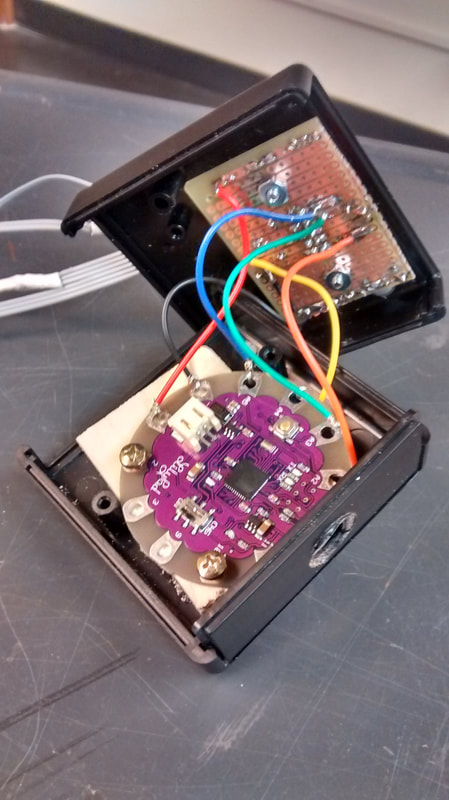
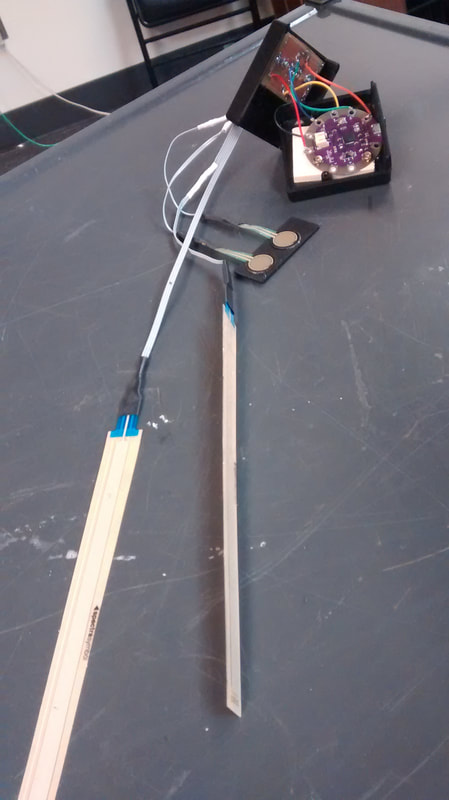
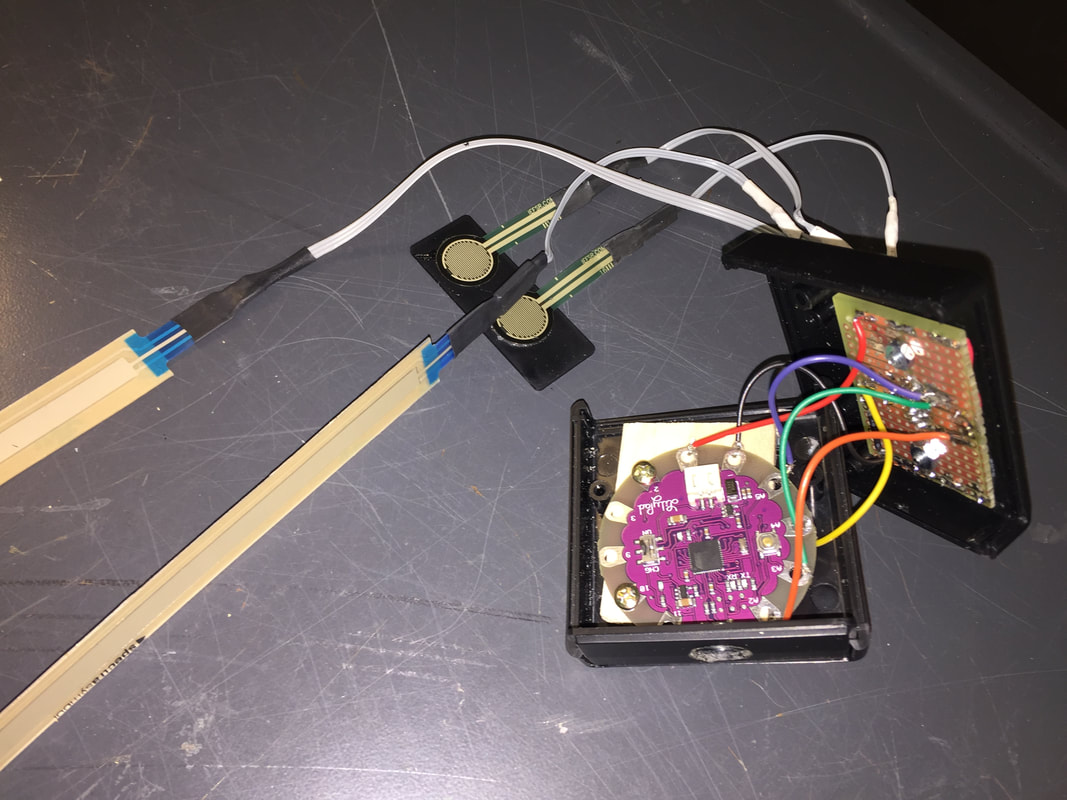
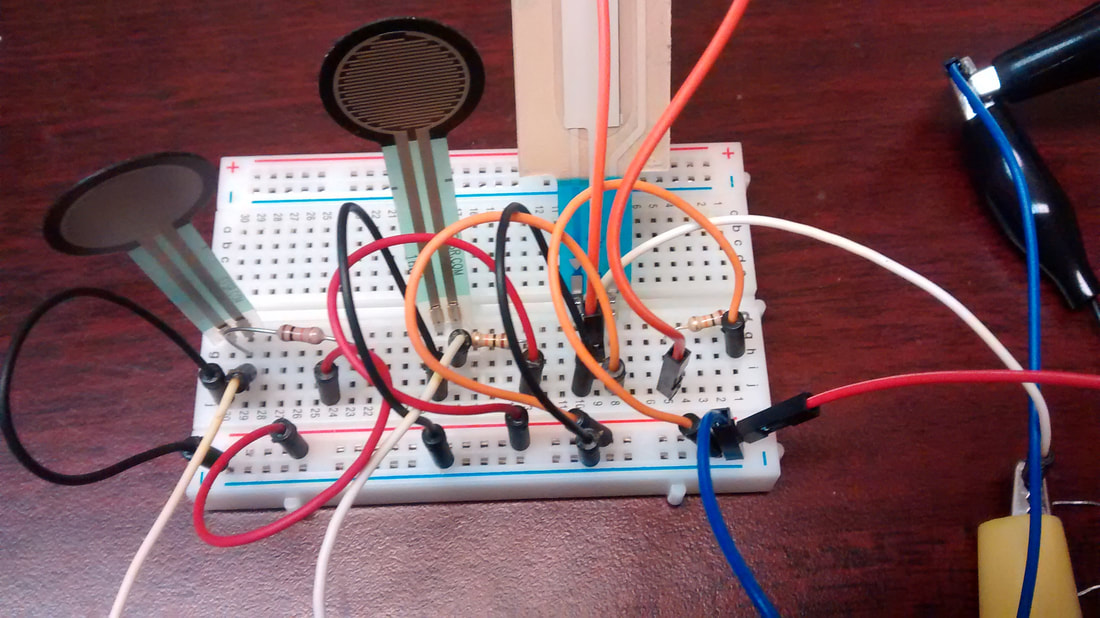
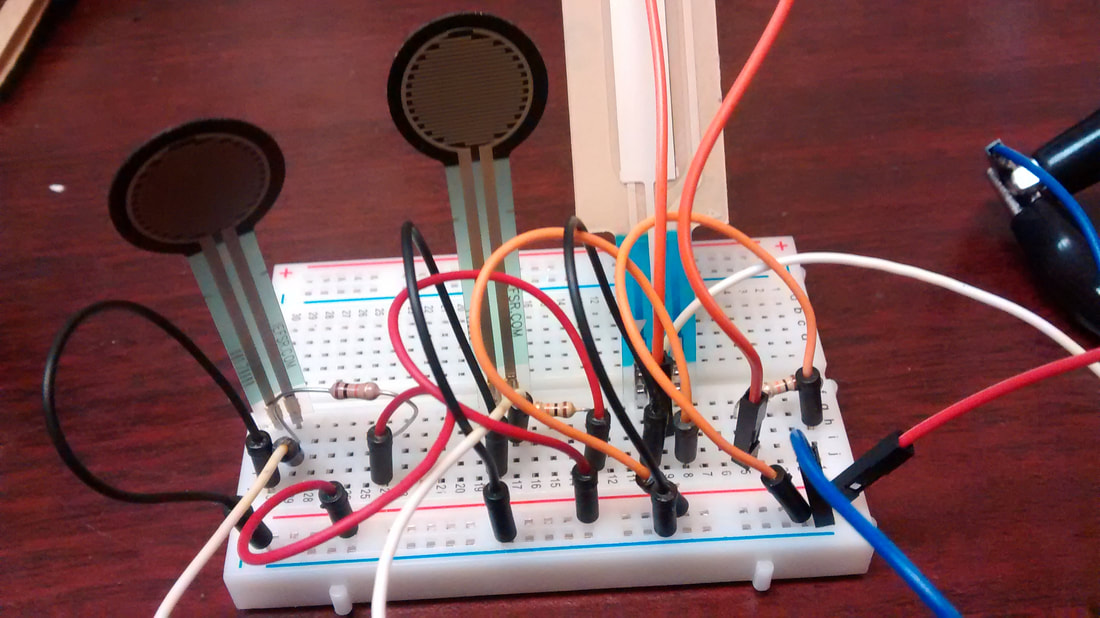
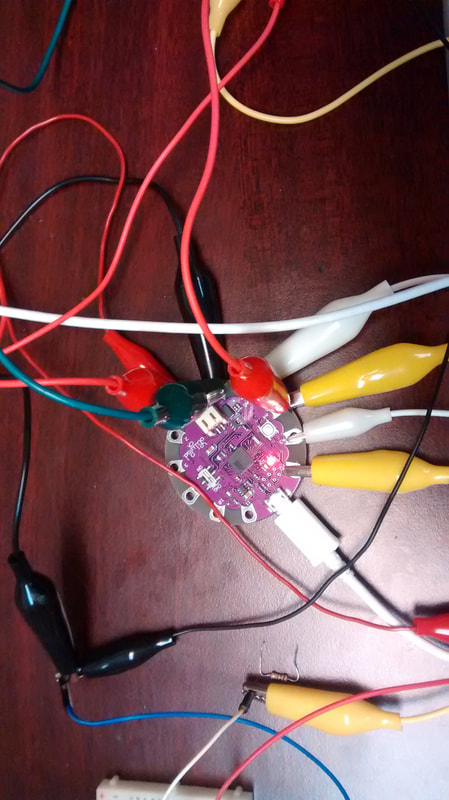
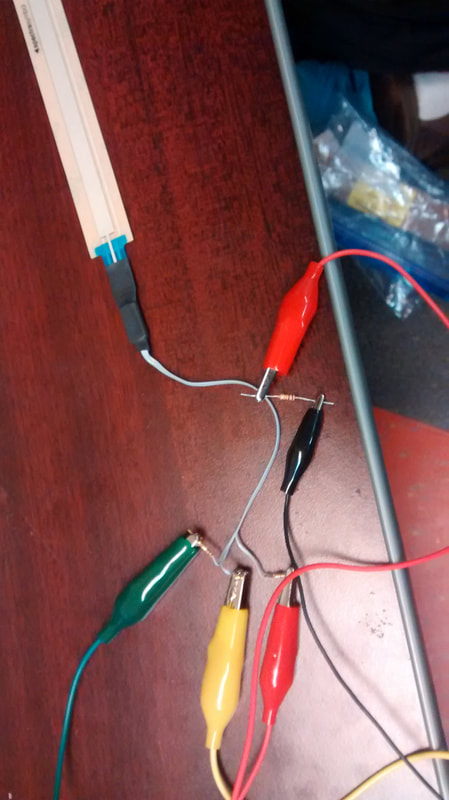
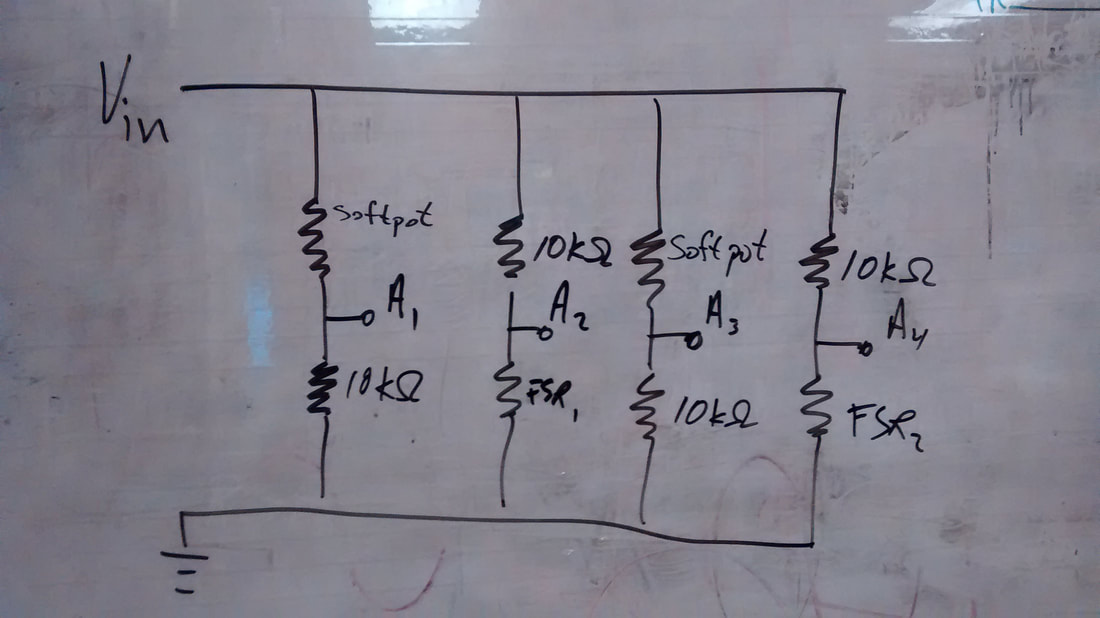
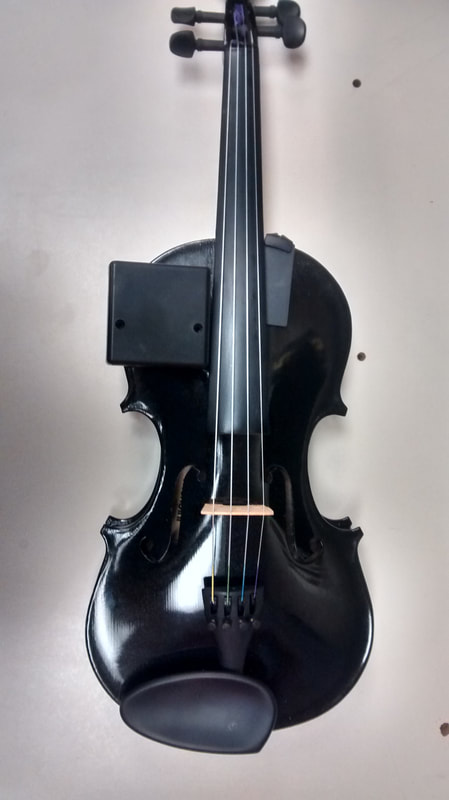
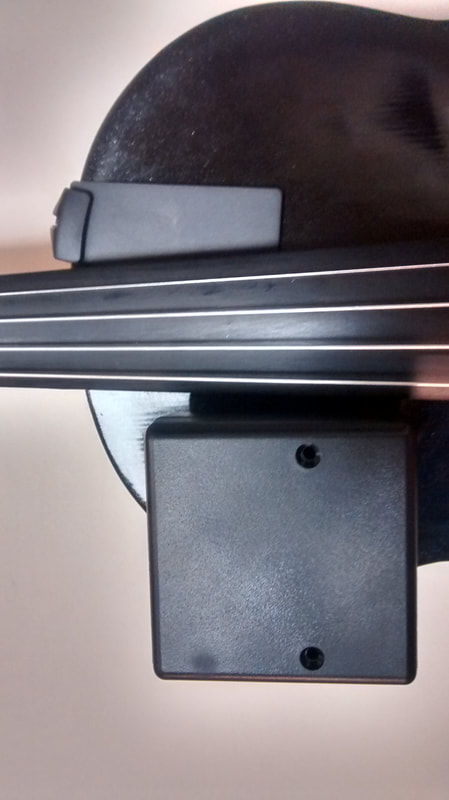
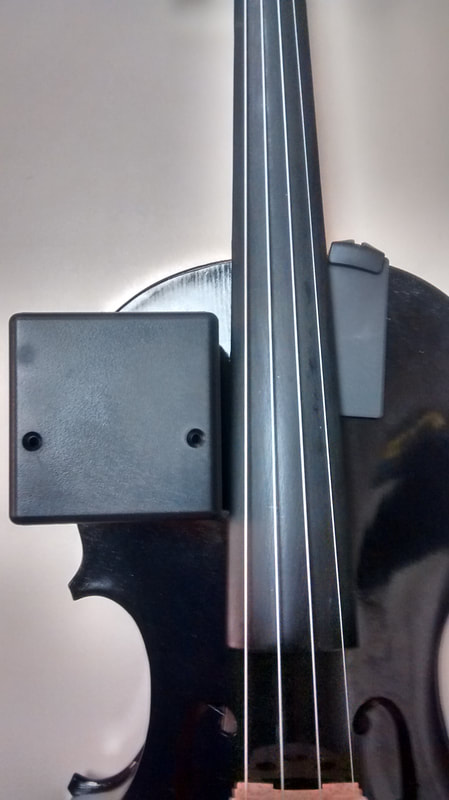
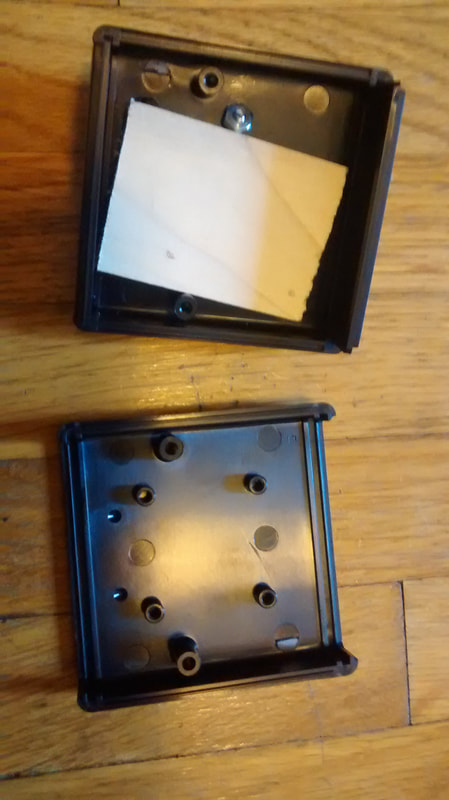
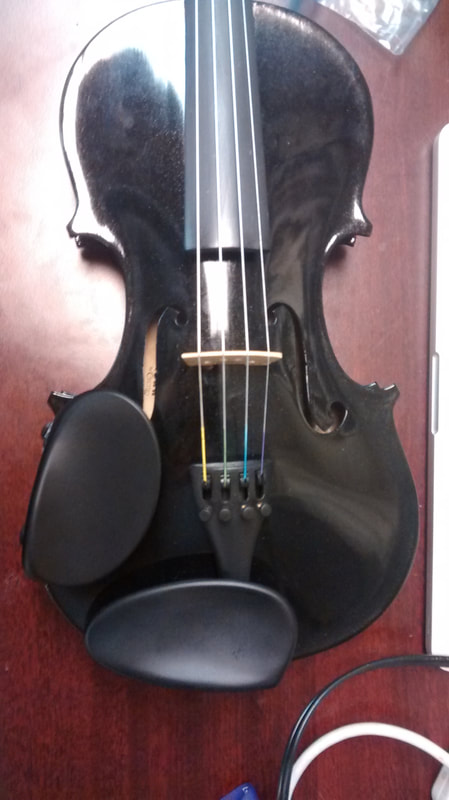
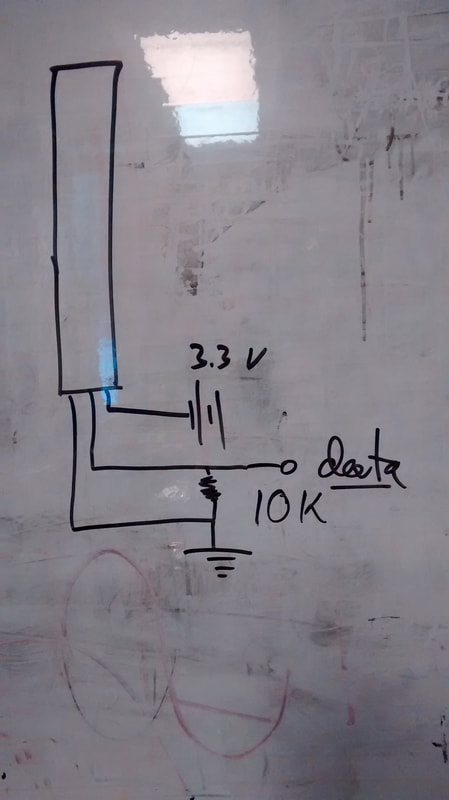
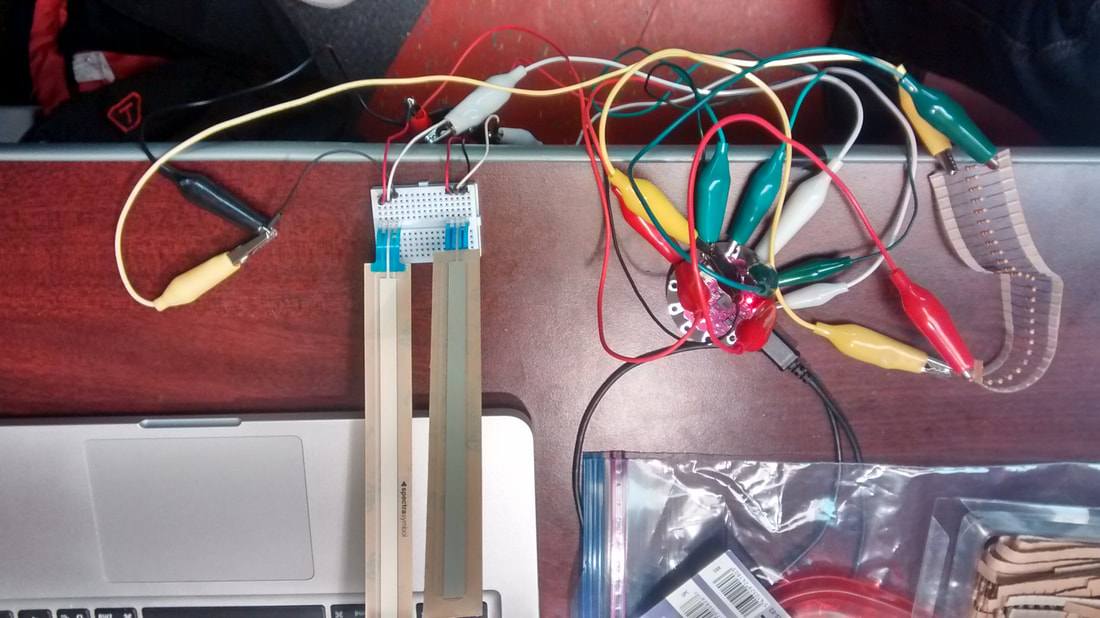
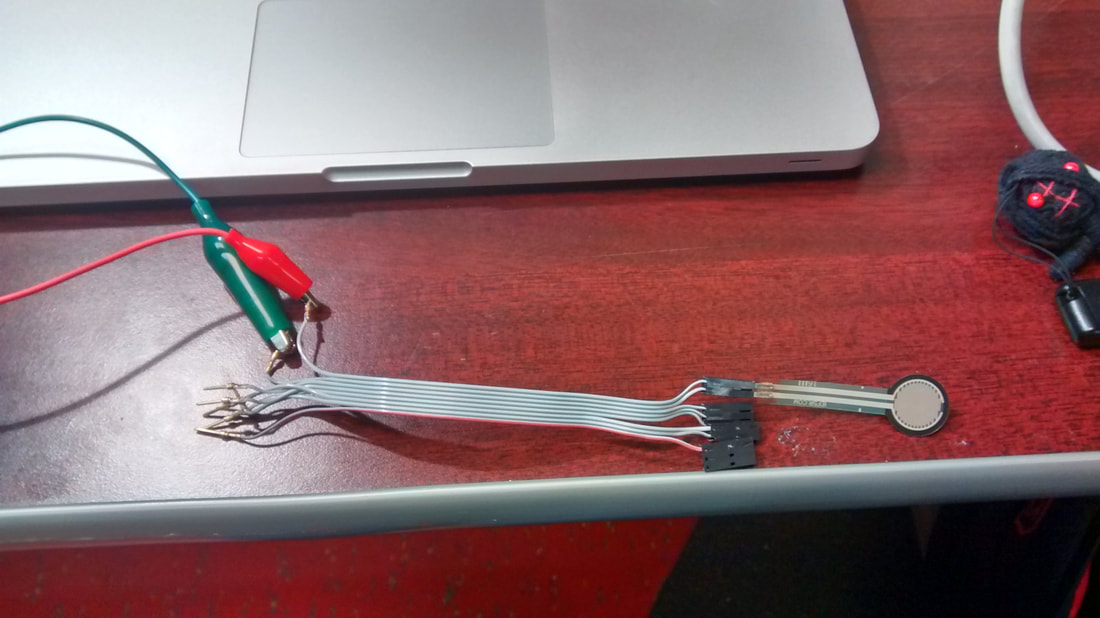
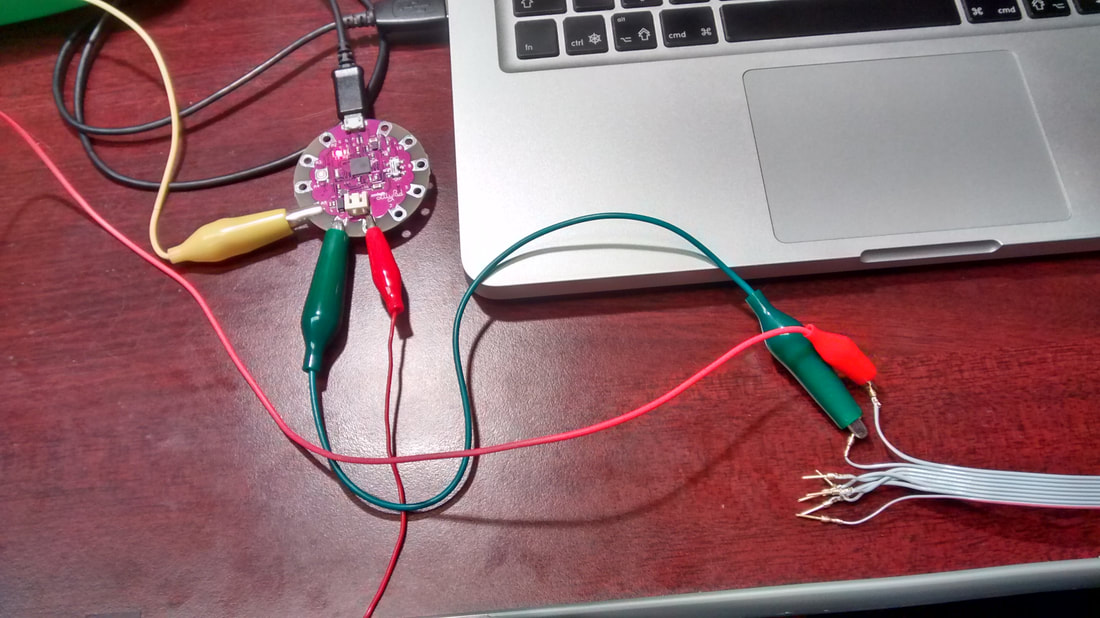
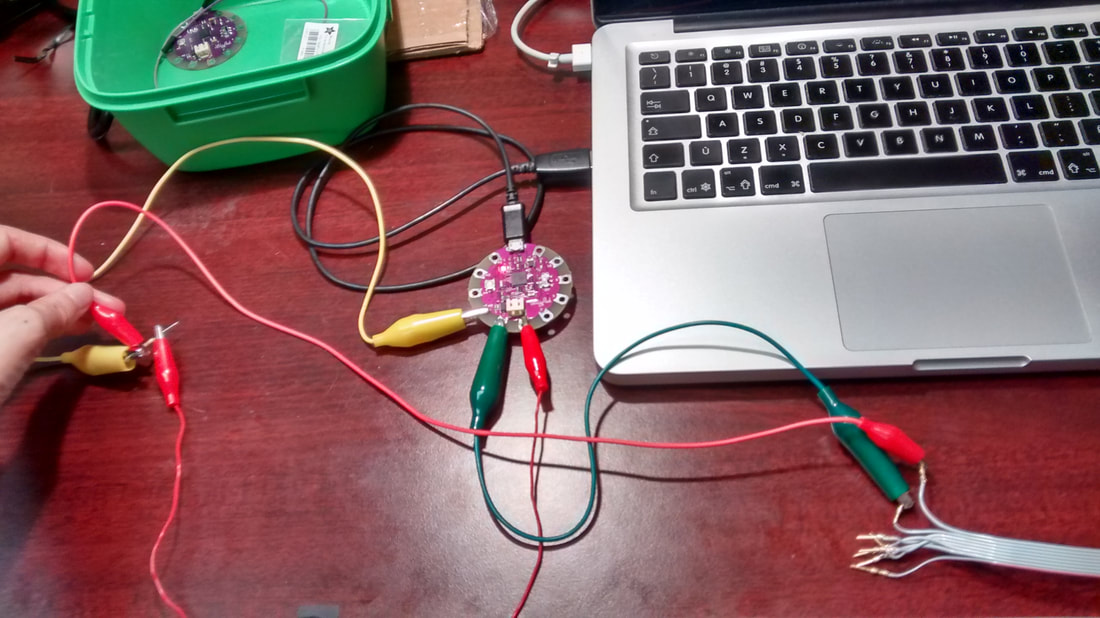
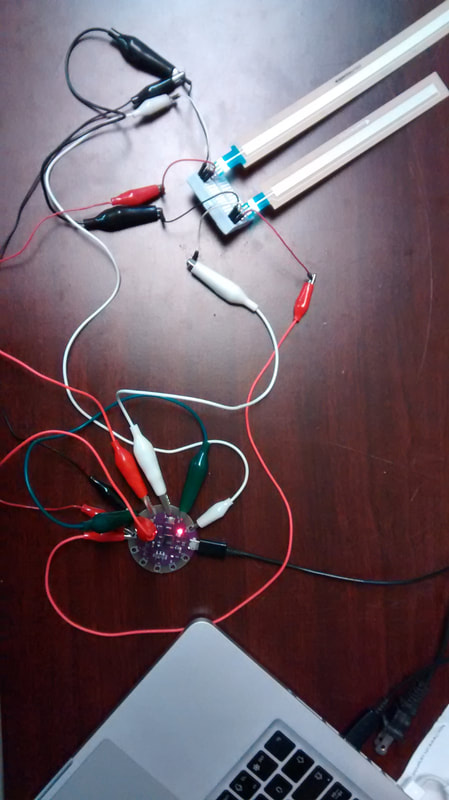
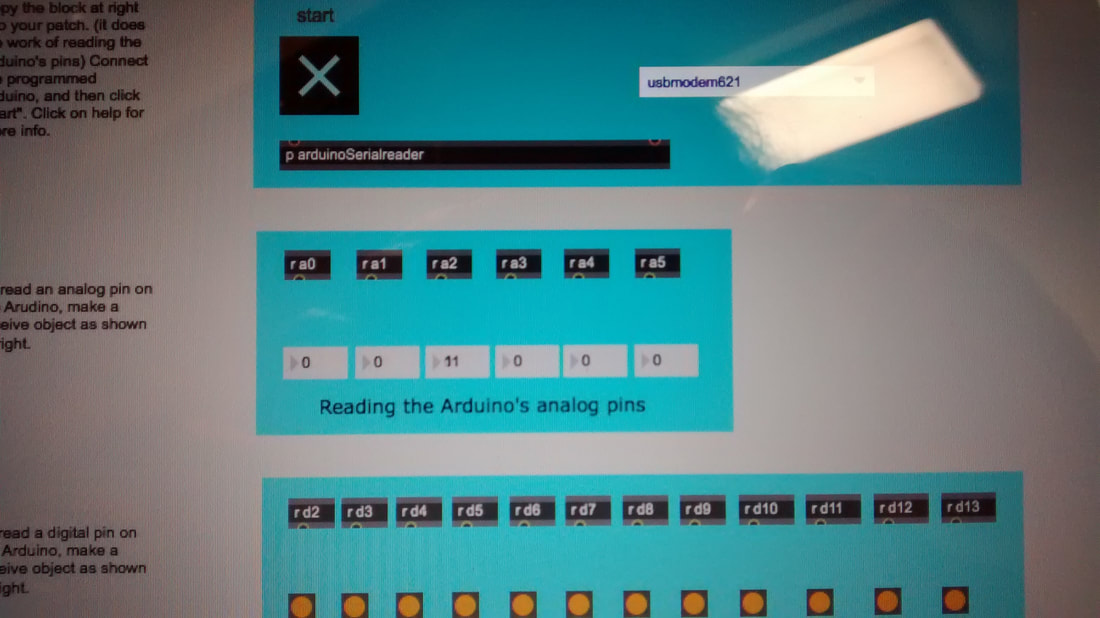
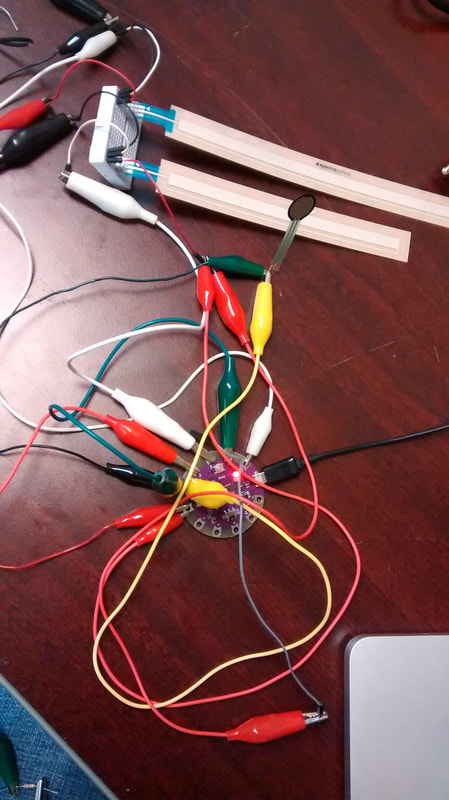
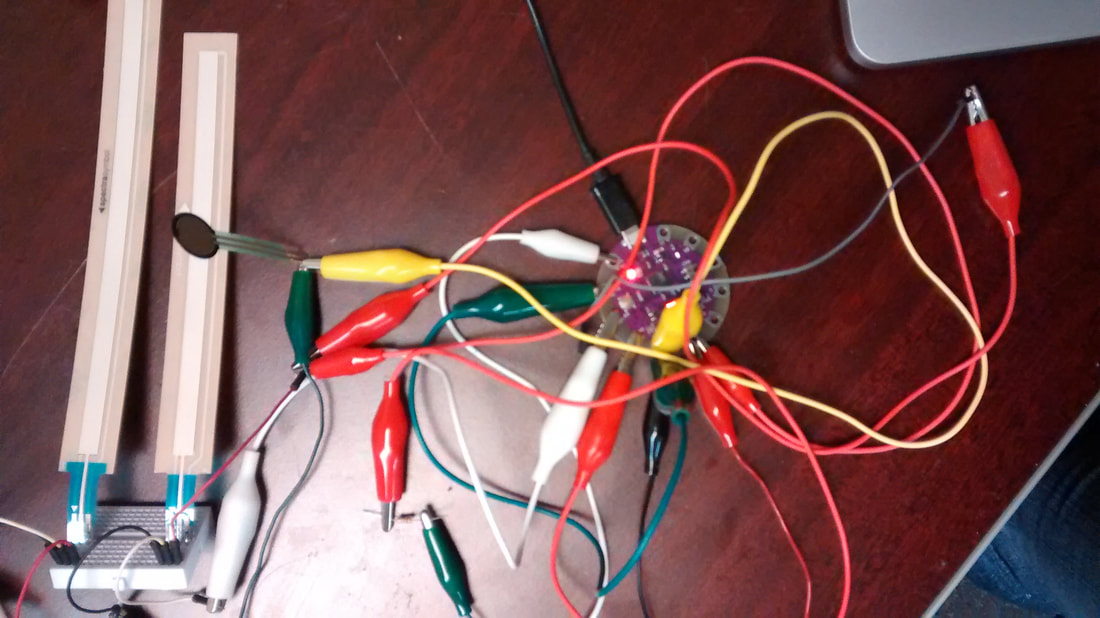
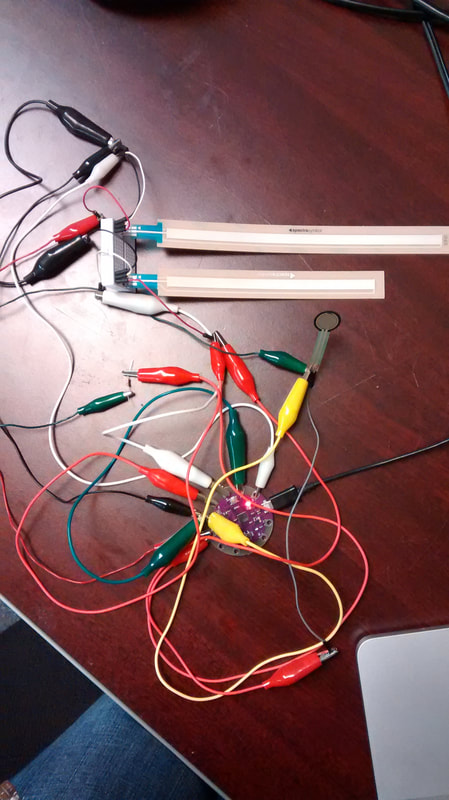
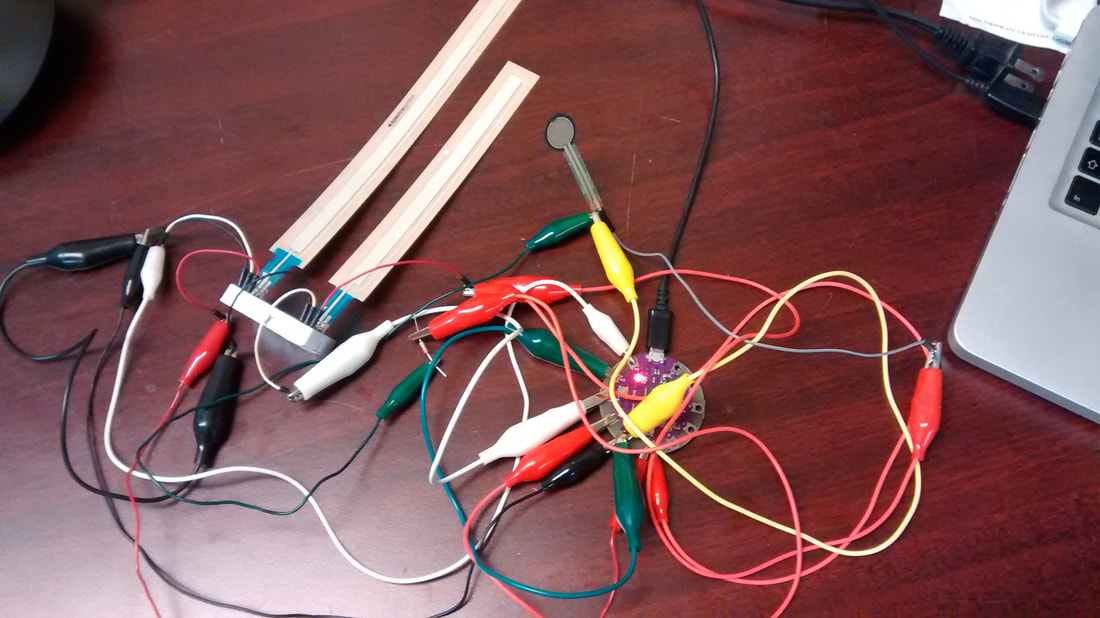
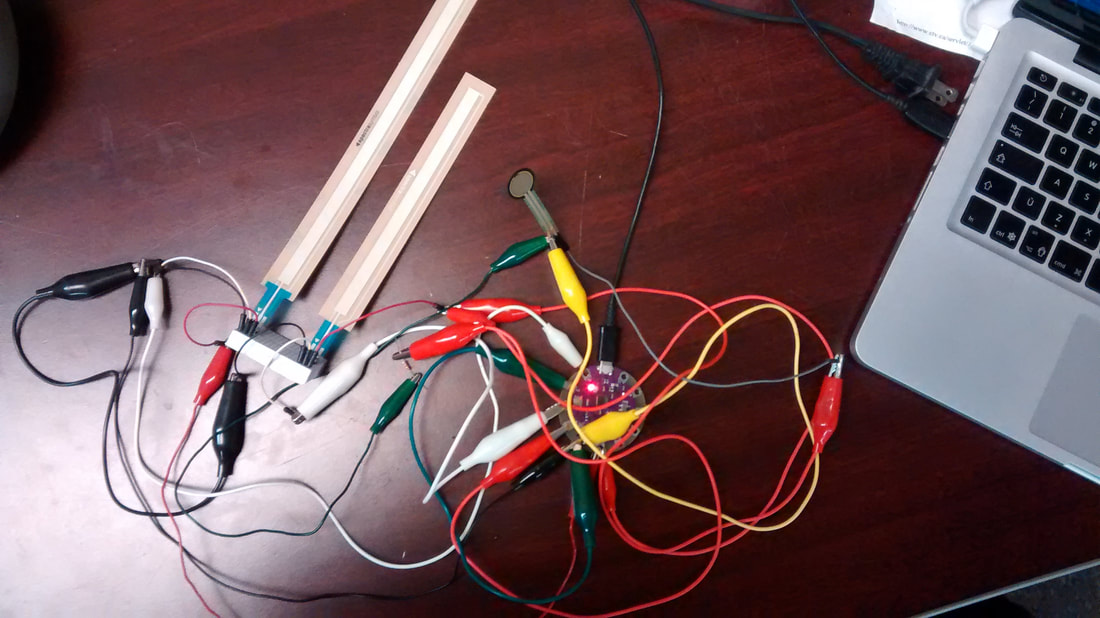
Yesterday and today I glued the FSRs to the plastic they'll be permanently attached to, I attached the sensors to the wiring with shrink wrap, soldered the circuitry, and bolted down the Arduino. Almost there! I originally thought it would be best to bolt a piece of wood onto the other chin rest mount. However, I found it was best to take an extra side that came with the box, hold it under the post, and place the post upside down. That way it stays as close as possible to the violin and it is out of the way of my left hand. It also will allow for the wiring to slip under the fingerboard to the box. The piece of wood I got proved to still come in handy because it will allow for the Lilypad to be bolted down into the box. I also used a different breadboard to make the wring less confusing when all four sensors are attached. Yesterday, I had finished the basic programming for the four softpot presets: added together as one strip, one strip with reversed values, separate strips, and separate with reversed values. We drilled a hole in the box that will hold the arduino and mounted it on my violin via one chin rest post. Due to the length of the head of the bolt, I had to use the 4 height setting of the Wittner mount so that way the bolt does not dig into the violin. I found that since the box is light, one post is enough. This is great because it means instead of sticking the FSR's directly onto my violin, I can use a piece of wood and mount the FSR's on with the other post. It is also a really good thing that the box is easily detachable because the violin does not fit in its case with the box attached. This affects how I will later hook up all the necessary circuitry because I'll need it to be able to easily and quickly assemble and disassemble. I had measured how far I can place the 200mm soft pot along the fingerboard without the open string hitting it. It actually goes a lot farther back then expected. If I was in first position on the G string, my 2nd finger first hits it in between a Bb and a B. I believe this makes placing the 150mm soft pot along the side of the neck arbitrary, so I have ordered another 200mm and will have two soft pots placed under my strings. I had also tested the the soft pot's and FSR's data coming in on adjacent analog petals. There is no bleeding of data from the soft pot into the FSR like there is when two soft pots are hooked up to adjacent petals. There is something about the FSR that grounds it better. This means that I will hook up my sensors in the following order: soft pot, FSR, soft pot, FSR. I bought a second FSR. And it works beautifully. My plan is to have one FSR bang presets for which sound fx are being used. The other will decide between four setups for the soft pots: the two soft pots are working as a single strip, independently, reverse the scaling as a single strip, or reversed and they are independent. This will allow for more creative possibilities, for example, if the two soft pots are separated, they can control different fx. If the scaling can be reversed at will, the fx can both (for examples sake) be either wet or dry while playing in the same position, based on the setting the player chooses. There is no bleeding of data when they are setup like in the picture. However, I remember there is bleeding data when it came to the soft pots being side by side. The solution was to place them a petal apart and ground the petal in between. With only four analog petals, and four sensors, this may be a problem. I had left my soft pots at UBC, so I will test them out when I return tomorrow. 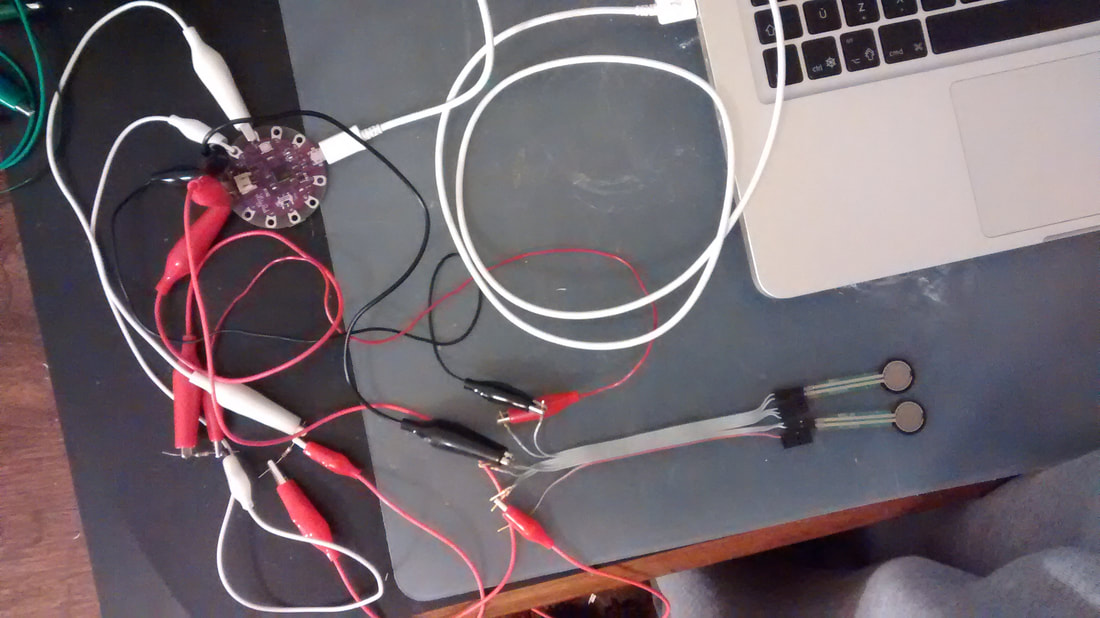 I had used a glue gun to glue the post to my chin rest, but I knew it would be a temporary fix. I had purchased plastic model cement, which I had hoped to be better. However, it does not like whatever material the chin rest is made out of. Dr. Bob had brought in a box which he thinks the Lilypad and circuit board will all fit into. After seeing it, I got the idea that instead of attaching the box to the chin rest, I could attach the posts of the chin rest directly to the box. This will also allow me to place it where I had originally intended in the upper left side. I also played around with ways to use the soft pot to control various sound fx. One in particular is the [sogs~] object. I'm not sure if I like it though. 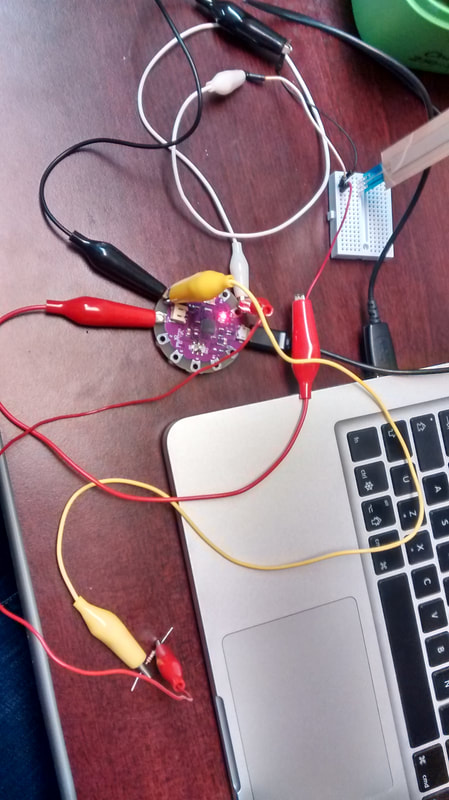 For my project I am using a Mendini painted black violin. It was given to me a few years ago so that I would have an instrument for busking that is both visually flashy and I wouldn't care if it got damaged by the weather. Now it is the perfect violin for my project because under no circumstances would I stick sensors to me good violin. Today I worked on the practicality of attaching the Arduino to the violin. A while back I had accidentally broke on of the posts on my Wittner adjustable chin rest. It's a good thing I held onto it! I had glued the broken post into place and attached it to the lower left side of my violin. The idea is that the Arduino will sit onto of the extra chin rest. At first I had imagined it would be best to place it on the upper left side, but when I tried it, it would not attach there because of the angle. I had also programmed a way for the soft pots to act like one long strip. However, the jitter is a problem. When one of them is pressed, it works the way I want and expected it to. But when both of them are released, the jitter causes the program to rapidly switch between each soft pot. The solution is to add a resistor to both of them, which brings their resting value to 0. Some of the best discoveries are made by accident. I started by hooking up the FSR and found that I was receiving values up to 1023. This confused me because I didn't get anywhere close to that number last time. I went back to my last pictures and realized I had hooked up the FSR incorrectly last time, and that is why I only got a few values as opposed to 1023. The FSR is only going to be used to bang presets, so on the programming side, it is a simple fix with changing the threshold. The first picture is the wrong way. The bottom three pictures are correct. 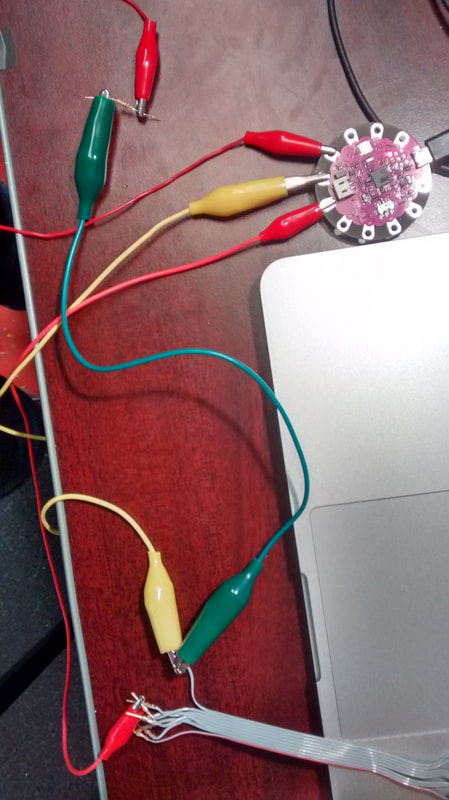 I am using an Arduino Lilypad USB simply because it is the Arduino that I have. I may purchase a different Arduino in the future. When I had first hooked up the soft pots, they were connected to petals A2 and A3 (right beside each other). With that setup, data was bleeding from A2 into A3. I discovered that if I hook them up a petal apart (A2 and A4), and ground the petal in the middle, it fixes the bleeding problem. Values from both soft pots are between 0-1023. They are quite jittery. I then added the FSR and got values 0-5ish. Problems: how to combine the soft pots so they act like one long strip? |
Welcome to the TRAVIS blog!If you would like to see a summary of my work, please click here. Archives
May 2022
Categories

|


 RSS Feed
